Use VS Code to create PowerShell scripts to move files into folders by date
Recently while cleaning up a bunch of old hard drives and getting ready to sell / give them away, I found a ton of old photos. Unfortunately I found that many of them had the same file names and weren’t sorted at all. In fact, I had no way of filtering them in any way meaningful. I resigned myself to manually create folders by day and throw them into the folders. That lasted all of 5 minutes.
VS Code (Visual Studio Code) is a great little program that you can write software with. It’s lightweight, has debugging, extensions, code complete / IntelliSense (when you type, it will help finish your word), and best of all it’s FREE!
Task: Create folders based off of the modified date of photos, then move the photo into the folder
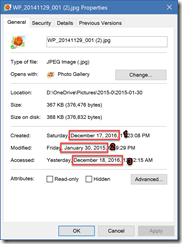
Example:
As you can see from the screenshot above, we have 3 different dates. I want this picture put into the folder named 2015-01-30 because that’s the best date that can be found according to when the picture was taken, not when it was moved or “created” because obviously those dates are wrong.
So let’s see how we can do this.
Installing VS Code
Navigate over to https://code.visualstudio.com and download the software. You’ll want to do this on Windows, although VS Code will work on Mac, Linux, and Windows.
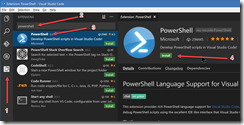
Once installed, then you want to run it and click the bottom left button and install the PowerShell extension. Screenshot below.
- Step 1: Click on the extensions icon
- Step 2: Search for PowerShell
- Step 3: Click on the extension (you can skip this)
- Step 4: Click on Install
- Step 5: Click on Reload
- Step 6: Click on Reload Window
Coding
We want to create a new file and give it a name with the extension of ps1. The extension makes sure Windows knows it’s a PowerShell script.
If we write the code and save it:
Write-Host “Hello World”
VS Code prompts us to create a launch.json file. This is just to help VS Code run the script and enable debugging so we can step through the code if we need to. The only thing that the configuration needs is the ps1 filename. We replace the word Script twice with the filename that we’re running.
After that we can run and debug to our heart’s content. Here’s the following code that I wrote to accomplish the task:
$SourceDir = “C:\Users\RandyWalker\Desktop\Pictures\”
$DestinationDir = “C:\Users\RandyWalker\Desktop\FolderPictures\”foreach ($file in get-childitem $SourceDir .)
{
$Directory = $DestinationDir + $file.LastWriteTime.ToString(“yyyy-MM-dd”)
$FullDestinationDirif (!(Test-Path $Directory))
{
Write-Host “Created Directory : ” $DestinationDir $directory
New-Item $directory -type directory
}Write-Host “Moving file : ” $file.fullname ” to ” $directory
Move-Item $file.fullname $directory
}
Naturally you’ll want to change the $SourceDir and $DestinationDir to the folders you want. That’s pretty much all you’ll need to do. I manually placed the folders created into buckets of year, but I could have just as easily modified the code to also create a folder by year. Enjoy!

